Breaking down PyTorchRL
This page covers how to create a training script to run a basic experiment using PyTorchRL.
1. Starting a training script
PyTorchRL uses Ray 1 distributed framework internally to define and assign the available compute resources to the processes handling RL training. For that reason, it is important to initialize Ray at the beginning of every training script. In this example, we will initialize Ray on a single machine by simply calling ray.init(), but it can be initialized on clusters of arbitrary size. To do so, see the official Ray documentation.
PyTorchRL also uses multiprocessing, so it is important to define our script as the entry point of the program with if __name__ == "__main__":.
if __name__ == "__main__":

    import ray  # This line is only required when running in a cluster.
    ray.init()  # This line is only required when running in a cluster.
2. Defining a vectorized environment
The first step to train a RL agent is defining an environment to interact with. However this a somewhat special type of component, because we would normally want multiples copies of it. More specifically, we would normally want to stack multiple independent environments into a single one to make a more efficient use of compute resources during inference time.
To do that, we start by defining a function that creates single copies of the environment under consideration. We refer to it as the env_factory. Following, we can create a vectorized environment with PyTorchRL VecEnv component, which uses the env_factory to create multiples instances of the environment and stacks them together. PyTorchRL already contains env_factory functions to create some popular environments, such as Pybullet, Atari and MuJoCo, so we can import one of those.
from pytorchrl.envs import pybullet_train_env_factory
Nonetheless, here we have a slightly simplified version of the code we just imported. The complete version can be found here.
import gym
import pybullet_envs

def pybullet_train_env_factory(env_id, seed=0):
    env = gym.make(env_id)
    env.seed(seed)
    return env
As it can be observed, the function returns a gym.Env instance. Therefore, defining a version of this function for any other environment adapted to work with the OpenAI Gym interface is straightforward. Any gym.Wrappers can be added here as well. We can even define a different env_factory for training and for testing our RL agent, with different wrappers in each one. We won’t define a env_factory for testing in this tutorial, as it is not necessary.
from pytorchrl.agent.env import VecEnv

# Define Environment Vector
train_envs_factory, action_space, obs_space = VecEnv.create_factory(
    vec_env_size=1,
    log_dir="/tmp/train_example",
    env_fn=make_pybullet_train_env,
    env_kwargs={"env_id": "HalfCheetahBulletEnv-v0"})
Being able to scale to distributed regimes can require RL components to be instantiated multiple times in different processes. Therefore, defining RL in PyTorchRL components follows a similar logic to that to that of the env_factory. PyTorchRL RL components contain a specifically named class method, called create_factory, which returns a function allowing to create component instances, a component_factory. Instead of directly defining a single RL agent instance, we can define a component_factory for each component and pass them on to the training architecture component called Scheme, which will handle the creation of any training architecture we specify later on.
To continue with our example, we use the VecEnv.create_factory() method to create a factory of vectorised environments. This function takes in the env_factory, any kwargs we want to define for it, and the vec_env_size or number of copies we want to stack together.
Note
The VecEnv.create_factory() method accepts an optional parameter called log_dir. If provided, a gym.Monitor wrapper will be used to generate json log files for each individual environment in the vector.
3. Defining a RL agent
PyTorchRL subscribes the idea that composable agents are the best option to enable method experimentation. Individual components are easier to read, understand and modify. They also allow for method flexibility, as they can be combined in different ways.
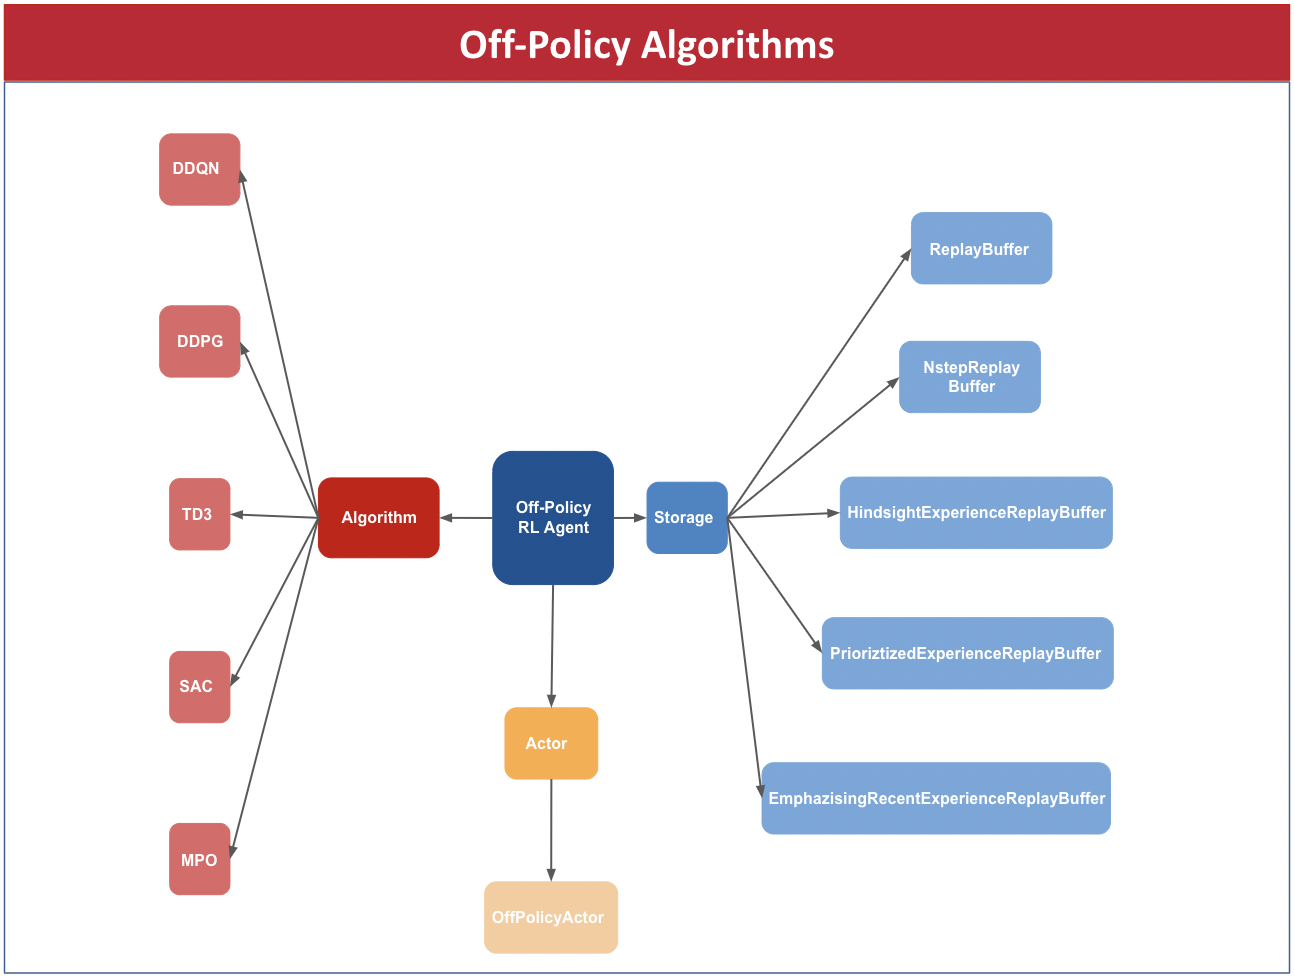
PyTorchRL distinguishes between 3 types of Agent components: the Algorithm, which manages loss and gradient computation, the Actor, implementing all deep neural networks used as function approximators, and the Storage, which handles data storage, processing and retrieval. Selecting an instance of each class and combining them we can create an agent.
Our current implementation contains the following components.


New components can be created and combined with already existing ones. For more information about how to do it, see Create a custom core component.
For our example, we can create an On-Policy Agent, using the Proximal Policy Optimization (PPO) algorithm, a Storage with Generalized Advantage Estimation (GAE) and an Actor Critic using MLP networks as feature extractors. To see the list of available feature extractors check the Feature Extractors section.
from pytorchrl.agent.algos import PPO
from pytorchrl.agent.storages import GAEBuffer

# Define RL training algorithm
algo_factory = PPO.create_factory(
    lr=1e-4, num_epochs=4, clip_param=0.2, entropy_coef=0.01,
    value_loss_coef=.5, max_grad_norm=.5, num_mini_batch=4,
    use_clipped_value_loss=True, gamma=0.99)

# Define rollouts storage
storage_factory = OnPolicyGAEBuffer.create_factory(size=1000, gae_lambda=0.95)
Note
Custom feature extractors can also be defined. For a more detailed explanation about how to do it, check Create custom feature extractors.
4. Customizing training scheme
Deep RL algorithms are generally based on the repeated execution of three sequentially ordered operations: rollout collection (R), gradient computation (G) and policy update (U). In single-threaded implementations, all operations are executed within the same process and training speed is limited by the performance that the slowest operation can achieve with the resources available on a single machine. Furthermore, these algorithms don’t have regular computation patterns (e.i. while rollout collection is generally limited by CPU capacity, gradient computation is often GPU bounded), causing an inefficient use of the available resources.
To alleviate computational bottlenecks, we can parallelize operation or even allow consecutive operations to be executed asynchronously. Even within the computational budged of a single machine, this solution enables a more efficient use of compute resources at the cost of some deviation from the original problem formulation. Furthermore, if actors can communicate across a distributed cluster as it is the case, this approach allows to leverage the combined computational power of multiple machines.
PyTorchRL contains a distributed component called Scheme which takes in the component factories as input parameters and allows to define the training architecture. More specifically, the Scheme class allows to specify how many processes work computing gradients to update the network, and whether this workers have a asynchronous communication pattern, passing on the gradients to the process in charge of updating the actor as soon as they have finished, or a synchronous one, waiting for all other workers to finish before sending all gradients at once. Similarly, the architecture can be further parametrized by specifying how many workers collect data from the environment to feed each gradient workers, and also if these workers synchronize or not.
from pytorchrl.scheme import Scheme

# Core components params
scheme_parameters = {
    "algo_factory": algo_factory,
    "actor_factory": actor_factory,
    "storage_factory": storage_factory,
    "train_envs_factory": train_envs_factory}

# Collection operation params
scheme_parameters.update({
    "col_remote_workers": 1,
    "col_communication": "synchronous"})

# Gradient computation operation params
scheme_parameters.update({
    "grad_remote_workers": 1,
    "col_communication": "synchronous"})

scheme = Scheme(**scheme_parameters)
Note
Note that Scheme has two parameters called col_remote_workers and grad_remote_workers. When these parameters are set to 1, data collections and gradient computation operations are not parallelized, and the training script in executed by a single process. We can increase their values to scale to more complex architectures to achieve faster training times. However, going back to a single-threaded implementation can be useful if we want to create new components and need to debug them.
5. Executing training loop
Finally, another class, called the Learner, helps us to define the training loop. The Learner class takes the Scheme, the target number of steps to train and, optionally, a path where to store the training logs log_dir as input parameters.
from pytorchrl import Learner

# 6. Define learner
learner = Learner(scheme, target_steps=1000000, log_dir="/tmp/train_example")

# 7. Define train loop
iterations = 0
while not learner.done():
    learner.step()
    if iterations % 1 == 0:
        learner.print_info()
    if iterations % 100 == 0:
        save_name = learner.save_model()
    iterations += 1
6. Checking results
Agent’s performance can be visualized running the following script:
from pytorchrl.envs import pybullet_test_env_factory
from pytorchrl.agent.actors import OnPolicyActor, get_feature_extractor

# Define single copy of the environment
env = pybullet_test_env_factory(env_id="HalfCheetahBulletEnv-v0")
env.render()

# Define agent device and agent
device = torch.device("cpu")
policy = OnPolicyActor.create_factory(
    env.observation_space, env.action_space,
    feature_extractor_network=get_feature_extractor("MLP"),
    restart_model="/tmp/train_example/actor_critic.state_dict")(device)

# Define initial Tensors
obs = env.reset()
done, episode_reward = 0, False
rhs = torch.zeros(1, policy.recurrent_hidden_state_size).to(device)

# Execute episodes
while not done:

    obs = torch.Tensor(obs).view(1, -1).to(device)
    done = torch.Tensor([done]).view(1, -1).to(device)
    with torch.no_grad():
        _, clipped_action, _, rhs, _ = policy.get_action(obs, rhs, done, deterministic=True)
    obs, reward, done, info = env.step(clipped_action.squeeze().cpu().numpy())
    episode_reward += reward

    if done:
        print("EPISODE: reward: {}".format(episode_reward), flush=True)
        done, episode_reward = 0, False
        env.render()
        obs = env.reset()
- 1
Philipp Moritz, Robert Nishihara, Stephanie Wang, Alexey Tumanov, Richard Liaw, Eric Liang, Melih Elibol, Zongheng Yang, William Paul, Michael I Jordan, and others. Ray: a distributed framework for emerging $\$AI$\$ applications. In 13th $\$USENIX$\$ Symposium on Operating Systems Design and Implementation ($\$OSDI$\$ 18), 561–577. 2018.